Grid search in the tidyverse
@drsimonj here to share a tidyverse method of grid search for optimizing a model’s hyperparameters.
Grid Search #
For anyone who’s unfamiliar with the term, grid search involves running a model many times with combinations of various hyperparameters. The point is to identify which hyperparameters are likely to work best. A more technical definition from Wikipedia, grid search is:
an exhaustive searching through a manually specified subset of the hyperparameter space of a learning algorithm
What this post isn’t about #
To keep the focus on grid search, this post does NOT cover…
- k-fold cross-validation. Although a practically essential addition to grid search, I’ll save the combination of these techniques for a future post. If you can’t wait, check out my last post for some inspiration.
- Complex learning models. We’ll stick to a simple decision tree.
- Getting a great model fit. I’ve deliberately chosen input variables and hyperparameters that highlight the approach.
Decision tree example #
Say we want to run a simple decision tree to predict cars’ transmission type (am) based on their miles per gallon (mpg) and horsepower (hp) using the mtcars data set. Let’s prep the data:
library(tidyverse)

d <- mtcars %>%
       # Convert `am` to factor and select relevant variables
       mutate(am = factor(am, labels = c("Automatic", "Manual"))) %>%
       select(am, mpg, hp)

ggplot(d, aes(mpg, hp, color = am)) +
  geom_point()
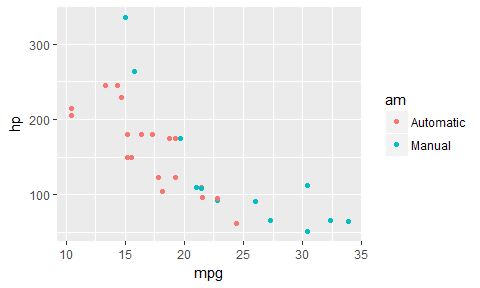
For a decision tree, it looks like a step-wise function until mpg > 25, at which point it’s all Manual cars. Let’s grow a full decision tree on this data:
library(rpart)
library(rpart.plot)

# Set minsplit = 2 to fit every data point
full_fit <- rpart(am ~ mpg + hp, data = d, minsplit = 2)
prp(full_fit)

We don’t want a model like this, as it almost certainly has overfitting problems. So the question becomes, which hyperparameter specifications would work best for our model to generalize?
Training-Test Split #
To help validate our hyperparameter combinations, we’ll split our data into training and test sets (in an 80/20 split):
set.seed(245)
n <- nrow(d)
train_rows <- sample(seq(n), size = .8 * n)
train <- d[ train_rows, ]
test  <- d[-train_rows, ]
Create the Grid #
Step one for grid search is to define our hyperparameter combinations. Say we want to test a few values for minsplit and maxdepth. I like to setup the grid of their combinations in a tidy data frame with a list and cross_d as follows:
# Define a named list of parameter values
gs <- list(minsplit = c(2, 5, 10),
           maxdepth = c(1, 3, 8)) %>%
  cross_d() # Convert to data frame grid

gs
#> # A tibble: 9 × 2
#>   minsplit maxdepth
#>      <dbl>    <dbl>
#> 1        2        1
#> 2        5        1
#> 3       10        1
#> 4        2        3
#> 5        5        3
#> 6       10        3
#> 7        2        8
#> 8        5        8
#> 9       10        8
Note that the list names are the names of the hyperparameters that we want to adjust in our model function.
Create a model function #
We’ll be iterating down the gs data frame to use the hyperparameter values in a rpart model. The easiest way to handle this is to define a function that accepts a row of our data frame values and passes them correctly to our model. Here’s what I’ll use:
mod <- function(...) {
  rpart(am ~ hp + mpg, data = train, control = rpart.control(...))
}
Notice the argument ... is being passed to control in rpart, which is where these hyperparameters can be used.
Fit the models #
Now, to fit our models, use pmap to iterate down the values. The following is iterating through each row of our gs data frame, plugging the hyperparameter values for that row into our model.
gs <- gs %>% mutate(fit = pmap(gs, mod))
gs
#> # A tibble: 9 × 3
#>   minsplit maxdepth         fit
#>      <dbl>    <dbl>      <list>
#> 1        2        1 <S3: rpart>
#> 2        5        1 <S3: rpart>
#> 3       10        1 <S3: rpart>
#> 4        2        3 <S3: rpart>
#> 5        5        3 <S3: rpart>
#> 6       10        3 <S3: rpart>
#> 7        2        8 <S3: rpart>
#> 8        5        8 <S3: rpart>
#> 9       10        8 <S3: rpart>
Obtain accuracy #
Next, let’s assess the performance of each fit on our test data. To handle this efficiently, let’s write another small function:
compute_accuracy <- function(fit, test_features, test_labels) {
  predicted <- predict(fit, test_features, type = "class")
  mean(predicted == test_labels)
}
Now apply this to each fit:
test_features <- test %>% select(-am)
test_labels   <- test$am

gs <- gs %>%
  mutate(test_accuracy = map_dbl(fit, compute_accuracy,
                                 test_features, test_labels))
gs
#> # A tibble: 9 × 4
#>   minsplit maxdepth         fit test_accuracy
#>      <dbl>    <dbl>      <list>         <dbl>
#> 1        2        1 <S3: rpart>     0.7142857
#> 2        5        1 <S3: rpart>     0.7142857
#> 3       10        1 <S3: rpart>     0.7142857
#> 4        2        3 <S3: rpart>     0.8571429
#> 5        5        3 <S3: rpart>     0.8571429
#> 6       10        3 <S3: rpart>     0.7142857
#> 7        2        8 <S3: rpart>     0.8571429
#> 8        5        8 <S3: rpart>     0.8571429
#> 9       10        8 <S3: rpart>     0.7142857
Arrange results #
To find the best model, we arrange the data based on desc(test_accuracy). The best fitting model will then be in the first row. You might see above that we have many models with the same fit. This is unusual, and likley due to the example I’ve chosen. Still, to handle this, I’ll break ties in accuracy with desc(minsplit) and maxdepth to find the model that is most accurate and also simplest.
gs <- gs %>% arrange(desc(test_accuracy), desc(minsplit), maxdepth)
gs
#> # A tibble: 9 × 4
#>   minsplit maxdepth         fit test_accuracy
#>      <dbl>    <dbl>      <list>         <dbl>
#> 1        5        3 <S3: rpart>     0.8571429
#> 2        5        8 <S3: rpart>     0.8571429
#> 3        2        3 <S3: rpart>     0.8571429
#> 4        2        8 <S3: rpart>     0.8571429
#> 5       10        1 <S3: rpart>     0.7142857
#> 6       10        3 <S3: rpart>     0.7142857
#> 7       10        8 <S3: rpart>     0.7142857
#> 8        5        1 <S3: rpart>     0.7142857
#> 9        2        1 <S3: rpart>     0.7142857
It looks like a minsplit of 5 and maxdepth of 3 is the way to go!
To compare to our fully fit tree, here’s a plot of this top-performing model. Remember, it’s in the first row so we can reference [[1]].
prp(gs$fit[[1]])

Food for thought #
Having the results in a tidy data frame lets us do a lot more than just pick the optimal hyperparameters. It lets us quickly wrangle with and visualize the results of the various combinations. Here are some ideas:
- Search among the top performers for the simplest model.
- Plot performance across the hyperparameter combinations.
- Save time by restricting the hypotheses before model fitting. For example, in a large data set, it’s practically pointless to try a small
minsplitand smallmaxdepth. In this case, before fitting the models, we canfilterthegsdata frame to exclude certain combinations.
Sign off #
Thanks for reading and I hope this was useful for you.
For updates of recent blog posts, follow @drsimonj on Twitter, or email me at drsimonjackson@gmail.com to get in touch.
If you’d like the code that produced this blog, check out the blogR GitHub repository.